

Using Batch Actions in Shelf
Shelf's batch actions let you act on many assets at once from the asset index Actions menu: custody, tags, location, category, asset model, kits, availability, audits, and deletion.
How to Use Batch Actions
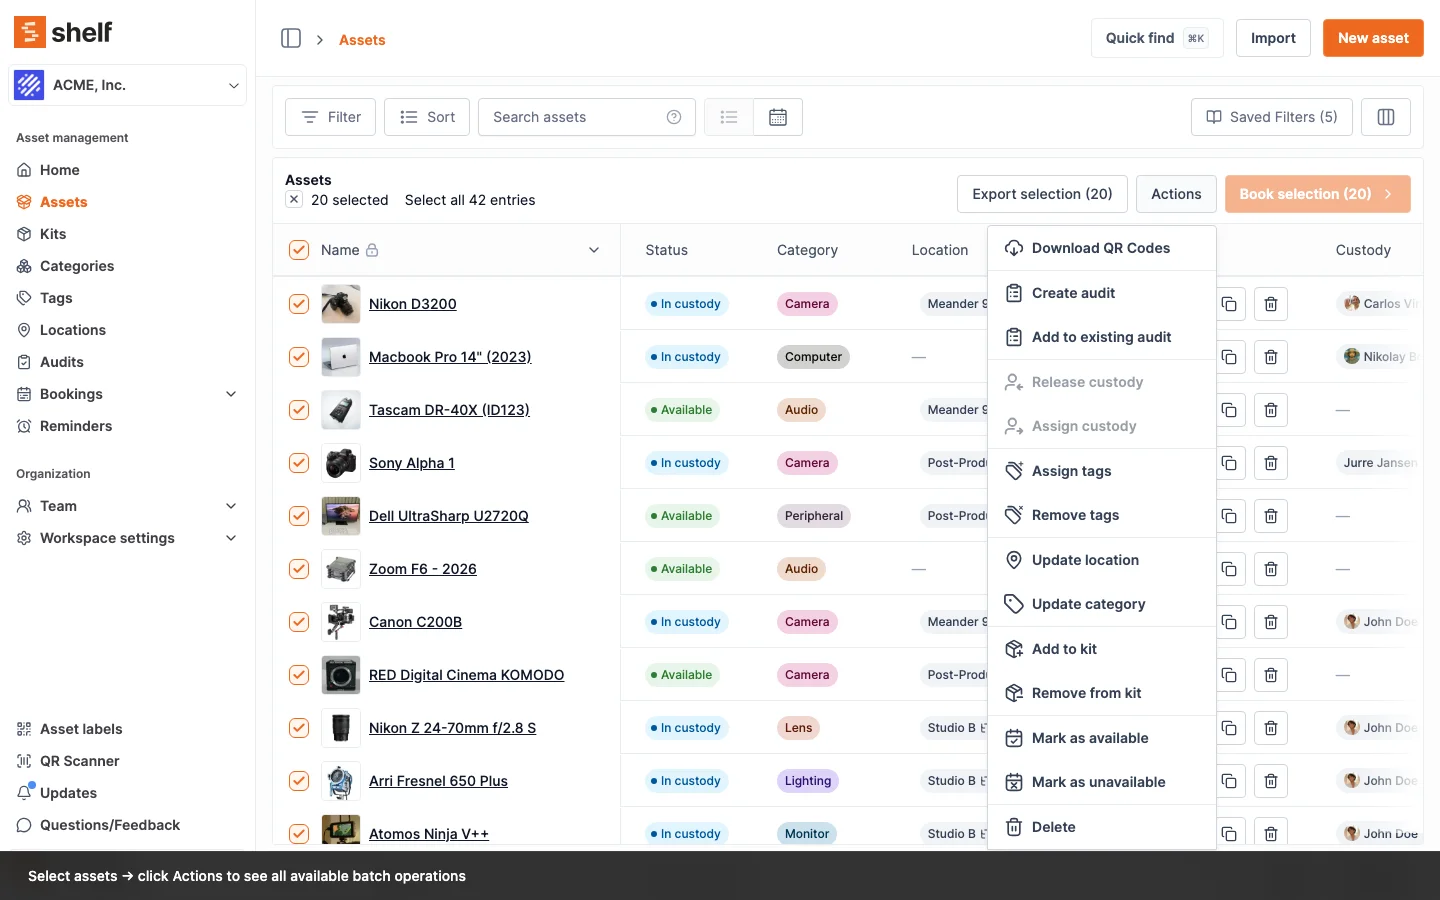
Step 1: Navigate to Assets Page
Access the Assets page in your Shelf workspace.
Step 2: Select Assets
- Use checkboxes adjacent to each asset for individual selection
- The checkbox in the header row ticks everything on the page you are looking at
- Once anything is selected, a Select all XX entries link appears next to the count. It reaches every asset that matches your current search and filters, across every page, not just the ones on screen
- Moving to another page of results, or changing how many rows a page shows, keeps your selection, so you can tick rows on page 1 and page 2 and act on them together
- Changing the search, a filter, or the sort clears your selection. Select after you have narrowed the list, not before
Select all follows your filters, not the whole workspace. This is the part worth being sure about before you use a destructive action. Search the index down to 12 items, click Select all 12 entries, and the action that follows applies to those 12 — not to the whole inventory. Clear your filters first and the same link covers everything, which is then exactly what you asked for. The count in the link is the number the action will touch, so read it before you confirm.
The same rule holds for the other lists that offer bulk actions, including the Tags list and the Assets and Kits tabs on a location. Filter the list, select all, and the action stays inside what you filtered to.
Why a new search clears what you ticked. A row you ticked before searching can drop off the screen when the results change. If it stayed selected, the next bulk action would still reach an asset you can no longer see. So Shelf starts the selection over whenever the search, a filter, or the sort changes. The pickers that add assets or kits to a booking, a kit or a location work the other way. There a tick means "this item is attached", so those ticks stay as you search.
Step 3: Access Actions Menu
Click the "Actions" dropdown menu located in the top right corner after making your selection.
Step 4: Choose Batch Actions
Available operations, in the order they appear in the menu:
- Download QR Codes: Get the QR labels for every selected asset in one file
- Create audit: Start a new audit covering the selected assets
- Add to existing audit: Fold the selected assets into an audit that is already running
- Release custody: Remove the current custodian from selected assets
- Assign custody: Assign a new custodian to selected assets (self-service users see Take custody)
- Assign tags: Add tags to assets in bulk
- Remove tags: Remove tags from assets in bulk
- Update location: Change the location of selected assets
- Update category: Modify the category of selected assets
- Update asset model: Group the selected assets into one Asset Model
- Remove from asset model: Take the selected assets out of whatever model they belong to
- Add to kit: Put the selected assets into a kit
- Remove from kit: Take the selected assets out of their kit
- Mark as available: Make items bookable/reservable in bulk
- Mark as unavailable: Make items unbookable/unreservable in bulk
- Delete: Remove selected assets from inventory
Some entries grey out when the selection does not suit them, with a short explanation on hover. Release custody needs every selected asset to be in custody, Assign custody needs them all to be available, and Add to kit and Delete are blocked while anything in the selection is checked out. The audit entries only appear for roles that can create or update audits.
One refusal arrives after you confirm rather than as a greyed-out entry. Release custody is turned down if any asset in the selection is in custody because its kit is, with "This asset is in custody because its kit is. Release the kit's custody instead." Nothing in the batch is released when that happens, so a mixed selection is refused whole rather than half applied. Release the kit's custody, or take the asset out of the kit, and run the batch again. See Custody a kit put there belongs to the kit.
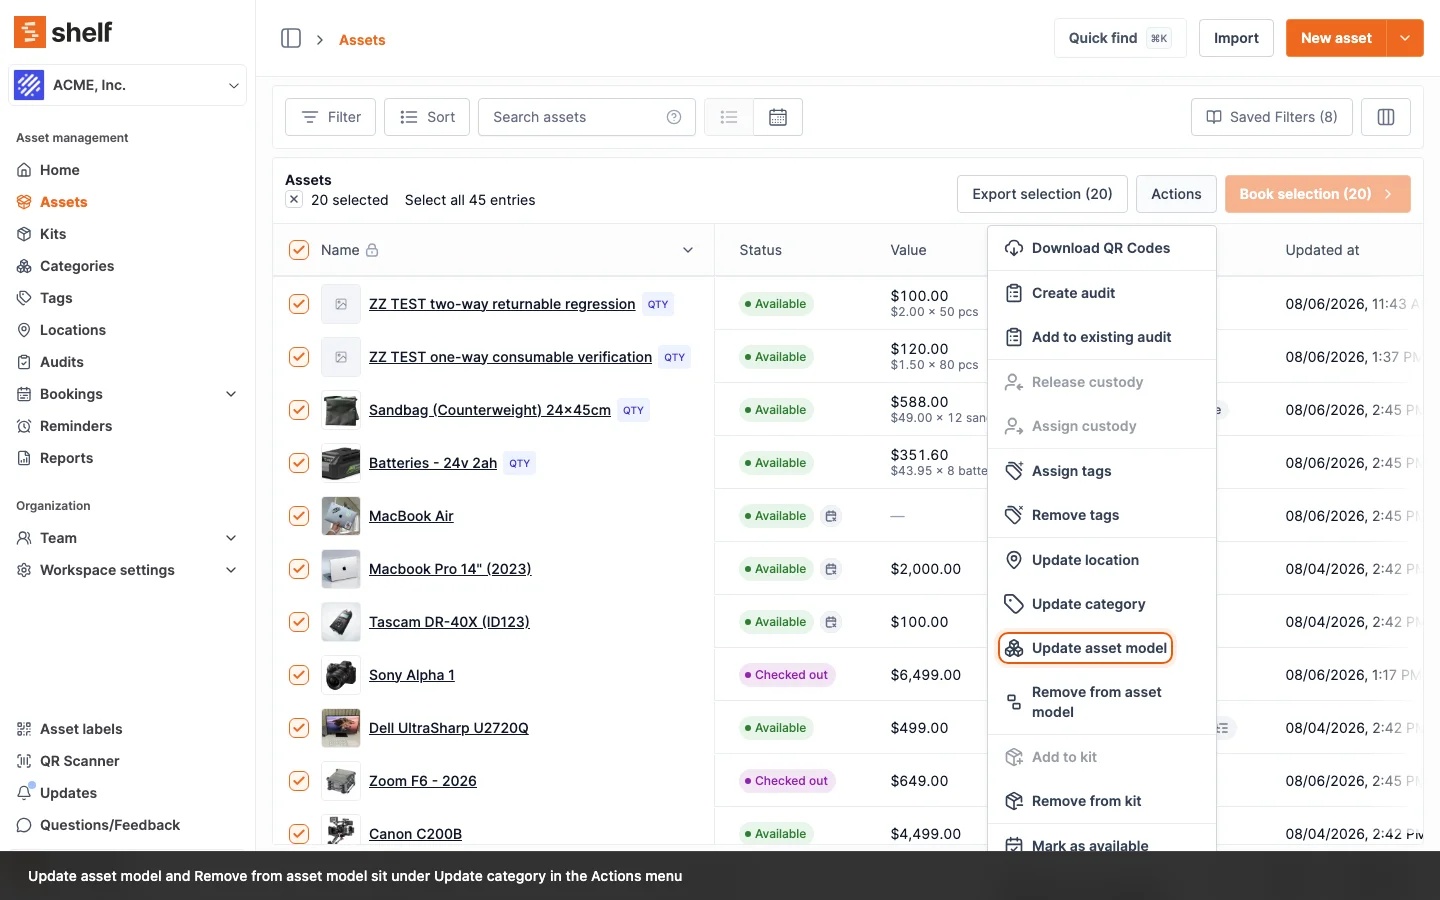
Step 5: Complete Action
Follow the prompts to finalize your chosen operation. Once the action succeeds, Shelf clears your selection automatically, so you can move straight on to the next batch without unselecting everything first. (Read-only operations like exporting data or downloading QR codes keep your selection, since they don't change anything.)
Quantity-Tracked Assets in a Batch
Quantity-tracked assets are pools of interchangeable units rather than single items, so any action that needs to know how many units you mean cannot be decided for a whole batch at once. Five entries in the Actions menu skip them rather than guessing:
| Action | Why it skips, and where to do it instead |
|---|---|
| Assign custody | Custody on a pool is by portion. Assign it on the asset with the number of units, or scan several pools with the scanner's Assign custody action, which asks for a quantity per asset. |
| Release custody | The same, in reverse: end the hold on the asset's custody row, or scan with the scanner's Release custody action. |
| Update location | A placement is a location plus a count. Use Manage placements on the asset. |
| Add to kit | A kit holds a slice of the pool, so the slice needs a size. Add it from the kit's manage-assets page. |
| Update asset model | Asset Models group individually tracked units only. |
In every case the dialog warns you before you confirm, naming how many of the selected assets will be skipped, so nothing is a silent no-op. The batch still runs on the individually tracked assets in the selection. If every asset you selected is quantity-tracked there is nothing left to act on, and the action is refused outright with the same reason.
What the records say. A batch records only what it actually did. Move a tripod and a roll of gaffer tape to a new location together and the destination's own activity feed names the tripod alone, because the tape never moved. The same holds for an asset that was already at the location you picked: nothing happened to it, so nothing is written about it. Before 18 September 2026 the location's feed listed every asset you had selected, including the ones it skipped, which made a location's history claim stock that had never arrived. Feed entries written before that date can overstate what a bulk move brought in.
Update location also refuses assets that sit in a kit. A kit owns its members' location, so a selection holding one is turned down with "Cannot update location for assets that belong to kits: [kit names]. Update the kit locations instead." Nothing in the batch moves when that happens. Change the kit's location instead, and every asset inside follows — see Kit Location.
Grouping a Fleet into an Asset Model
Update asset model is how you put a fleet you already own under one Asset Model, without opening each asset's edit form or re-importing a CSV.
- Filter or search the index down to the units you want to group, then select them.
- Open Actions and choose Update asset model.
- Pick the model in the picker, or use Create new asset model to make one on the spot.
- Click Confirm.
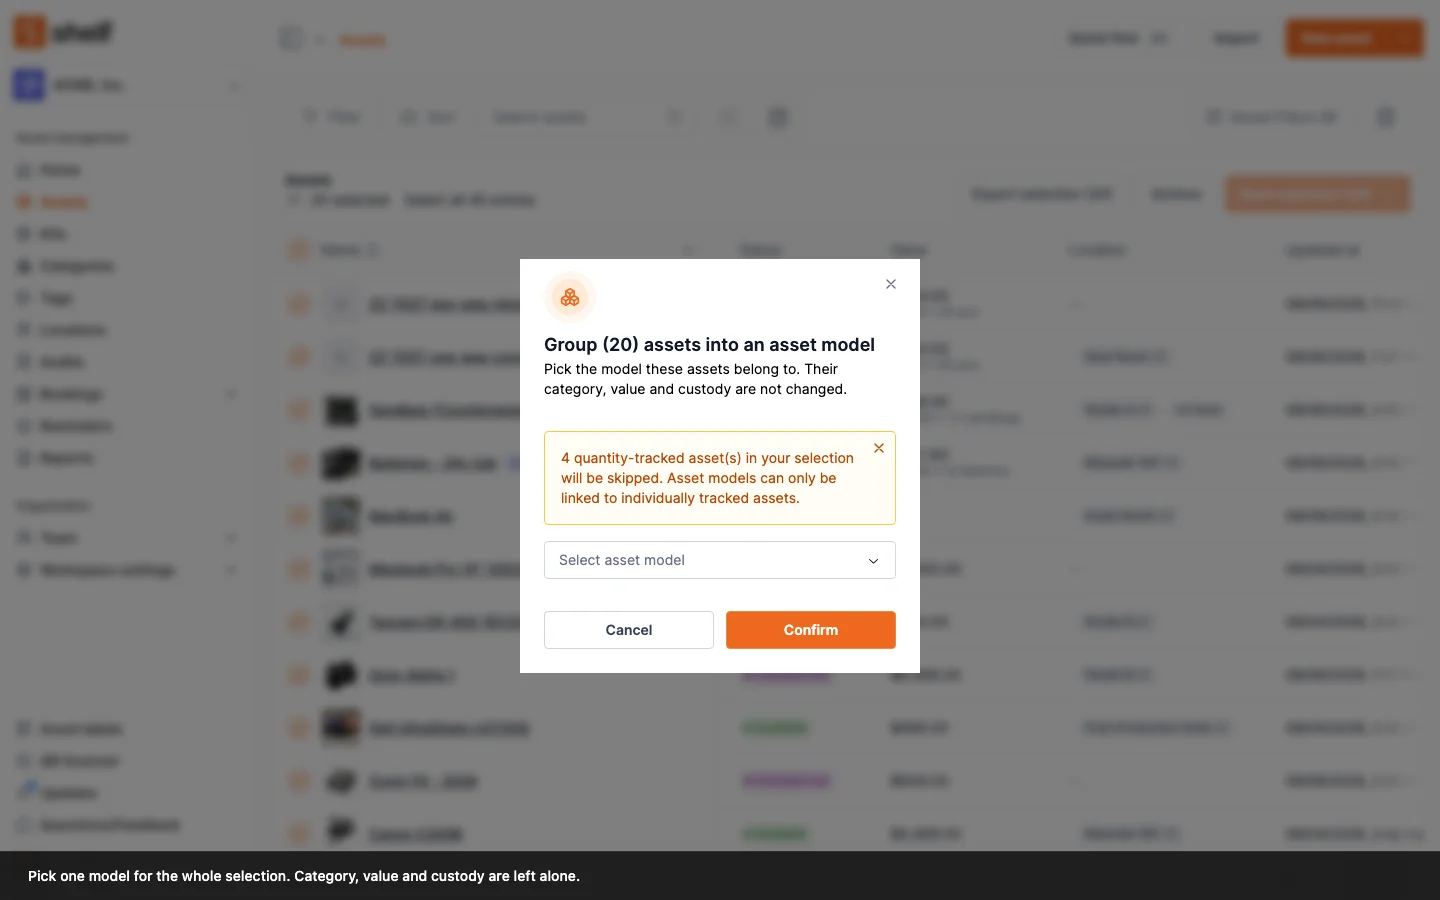
A few things are worth knowing before you confirm:
- Only the model link changes. Category, value, and custody are left exactly as they are. A model's default category and valuation are create-time conveniences, so they are not applied retroactively to assets you group this way.
- The picture is the exception, and it is not stored on the asset. If the model has a cover image, every grouped unit that has no photo of its own starts showing it immediately, and ungrouping takes it away again. Units with their own photo keep it. See Asset Models.
- Quantity-tracked assets are skipped, not rejected. Asset models group individually tracked units only. A mixed selection still works: the individually tracked assets are grouped and the dialog tells you up front how many will be skipped. The result message repeats the count afterwards.
- Assets already in another model are moved. The confirmation says how many changed model, which is your signal that a different model's book-by-model pool just got smaller.
- Every change is recorded on the asset. Each asset whose model actually changed gets a note on its activity naming both sides, for example changed the asset model from Model B to Model A, and the change counts in the Asset Activity Summary report. Assets that were already in the chosen model get nothing, because nothing happened to them. The same record is written when you change or clear the model on a single asset's edit form, when an
Asset modelcolumn changes it in a CSV bulk update, and when a model is deleted from Settings → Asset models.
Remove from asset model is the reverse and has its own menu item. It ungroups every selected asset and leaves everything else about them untouched.
If nothing changes, Shelf says so rather than reporting a silent success: you will see No assets updated with the reason, whether that is your filters no longer matching anything, the assets already being in that model, or none of them having been in a model to begin with.
Tips for Effective Use
- Combine batch actions with filters and sorting to locate and update specific asset groups efficiently
- Verify your selection before performing irreversible actions like deletion — check the count next to Select all matches what you expect to change
- Use batch updates for routine tasks such as reassigning equipment after team changes or updating locations following office relocations
By mastering batch actions, you maintain accurate, up-to-date asset inventory with minimal effort.
When to Use CSV Bulk Update Instead
Batch actions are great for updating a single field (location, category, tags) across many assets quickly. If you need to update multiple fields at once across a large set of assets — for example, updating name, category, location, and several custom fields in one pass — the Bulk Updating Assets via CSV workflow is more efficient. It lets you edit a spreadsheet and preview all changes before applying.
Ready to try Shelf?
Put what you're learning into practice. Free plan available — no credit card required.